Open source SOC automation project - status ongoing
SOC Automation Project: This project will implement a Security Operations Center with automated flow of events, alerts and active responses, in a local virtual environment with VMWare.
PART 1️⃣ - First notes published on 03/10/2024
1. Logical Diagram
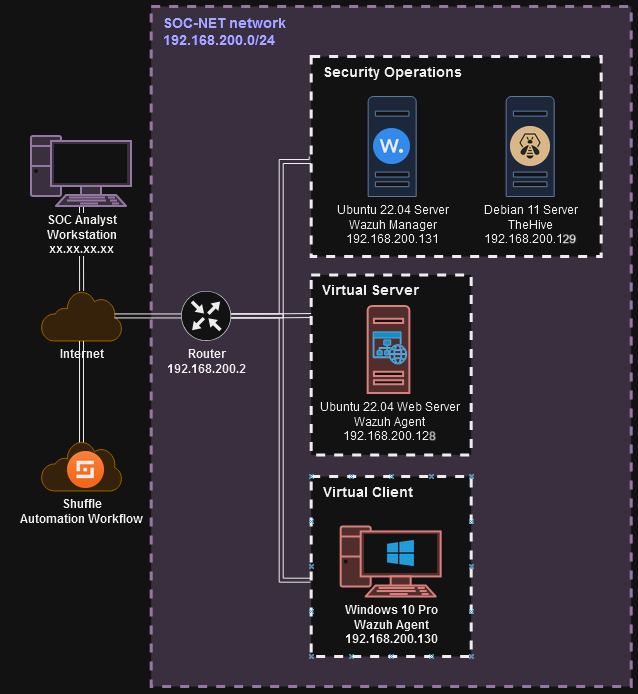
List of components that will be implemented:
1) A Windows 10 Client with a Wazuh Agent that will send its security events and receive the active responses.
3) Sysmon integration for Windows monitoring.
4) A web server in an Ubuntu 22.04 Server VM.
5) A Wazuh server hosted in an Ubuntu 22.04 VM that collects the events and sends the active responses.
6) Another Ubuntu 22.04 Server that will host TheHive for case management.
7) Shuffle.io for workflow automation.

2. Preparation of the components
2.1. Network configuration
In VMWare, we need to configure a virtual network for our SOC environment.
1) Access the Virtual Network Editor: Edit > Virtual Network Editor.
2) Configure a NAT network in an specific subnet:192.168.200.0/24.
3) Give it a name: SOC-NET.
All the machines should be set up on this network so they can communicate with each other.
2.2. Windows 10 Client - set up
For the virtual machine, we’ll create a Windows 10 ISO, which can be done through this official tool.
1) Create a new virtual machine with the created ISO image. Associate the machine with the SOC-NET network.
2) Start the machine and proceed with the installation.
3) Check the machine’s IP and network.
ipconfig
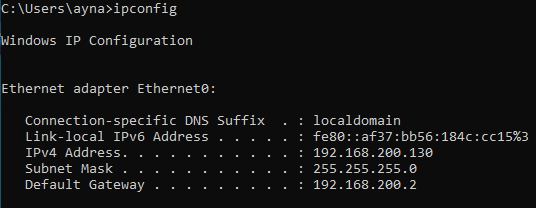
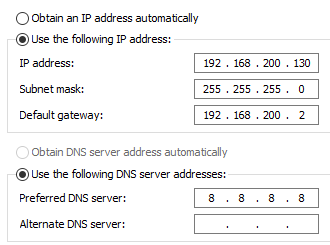
4) To change the network addresses, go to: Network & Internet Settings > Change adapter options > Right click on the machine's [Ethernet connection] > Properties > Select option [Internet Protocol Version 4 (TCP/IPv4)] > Properties > Select option [Use the following IP address]. Now we can add the desired settings. I chose to keep the initial assigned IP, netmask /24, default gateway, and preferred DNS server 8.8.8.8.
5) Set up Sysmon.
- Sysmon is a telemetry tool part of the Sysinternals Windows Suite. By integrating it with the Wazuh agent, we can analyse the logs it generates and detect malicious or anomalous activity.
- Sysmon Download
- We need a configuration file for Sysmon. We’ll be using this one. Download it into your Windows 10 Client. Extract the Sysmon executables into a Sysmon folder, and move the configuration file inside.
- In PowerShell with administrative privileges, install Sysmon using the configuration file (make sure you’re located in the Sysmon folder).
.\Sysmon64.exe -i sysmonconfig.xml - Once installed, we can find the Sysmon logs in:
Event Viewer > Application and Service Logs > Sysmon > Operational.
2.2. Web Server - set up
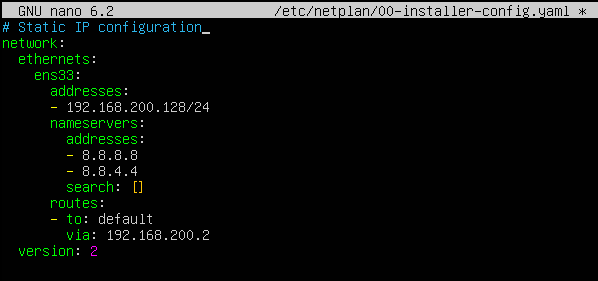
For the web server we’ll install an Ubuntu 22.04 server. We can set up the network during installation or after, modifying the /etc/netplan/*.yml file.
Try and apply the changes.
sudo netplan try
sudo netplan apply
Once installed, to configure a very basic web server, we need to follow these steps:
1) Update and upgrade Ubuntu.
sudo apt update && sudo apt upgrade -y
2) Install Apache for the web service.
sudo apt install apache2 -y
3) Start the Apache service and enable start on boot.
sudo systemctl start apache2
sudo systemclt enable apache2
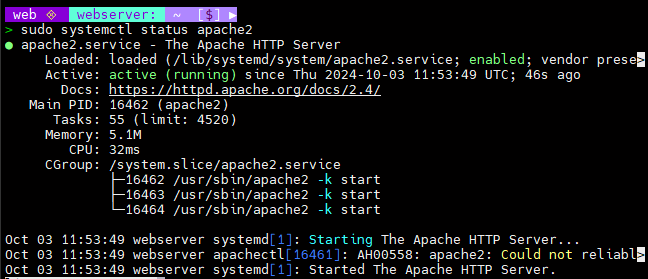
4) Check the Apache service status. The output should indicate it’s enabled and active.
sudo systemctl status apache2
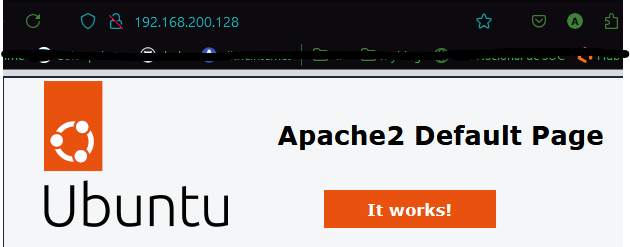
5) Now we can access the basic website on http://192.168.200.128:80. The output should look like this:
2.3. Wazuh Server - set up
As Wazuh itself defines it, “Wazuh is a security platform that provides unified XDR and SIEM protections for endpoints and cloud workloads”. For the installation of the server machine, we need to meet some requirements.
For this project, we will install an Ubuntu 22.04 server with 4 vCPU, 8GiB RAM and 50 GB on disk memory.
1) If we didn’t set up the static IP during installation, we can edit the network configuration file.
cd /etc/netplan/
sudo nano *.yaml # the name of the file may vary (e.g. 00-installer-config.yaml)
2) Define the static IP, default gateway and DNS servers.
# Verbose network set up
network:
  version: 2
  renderer: NetworkManager
  ethernets:
    ens33:
      dhcp4: false
      addresses: [192.168.200.131/24]
      routes:
        - to: 0.0.0.0/0
          via: 192.168.200.2
          on-link: true
      nameservers:
        addresses:
          - 8.8.8.8
          - 8.8.4.4
3) Download and run the Wazuh installation assistant.
curl -sO https://packages.wazuh.com/4.9/wazuh-install.sh && sudo bash ./wazuh-install.sh -a
4) Check and save the Wazuh credentials displayed on the last lines of the installation process. Otherwise, extract the wazuh-passwords.txt file from wazuh-install-files.tar.
sudo tar -O -xvf wazuh-install-files.tar wazuh-install-files/wazuh-passwords.txt > wazuh-credentials.txt
5) We can access the Wazuh Dashboard on https://<wazuh-ip>:443 with the user admin and the generated credentials.
2.4. TheHive - installation
TheHive is a Security Incident Response Platform, and we’ll install this on a different Ubuntu 22.04 Server.
PART 2️⃣ - New notes published on 12/10/2024
⚠ Corrigendum
TLDR: I had to reinstall TheHive because I missed the VM’s requirements.
Explanation: When I continued the project with the configuration of TheHive, I encountered many issues. After much troubleshooting, I realized the issue was the RAM dedicated to the VM. So I decided to reconsider the installation process because I overlooked that TheHive have their own installation script which “automates the process of fetching necessary components and configuring the system for optimal performance”.
Rejected previous notes on 09/10/2024
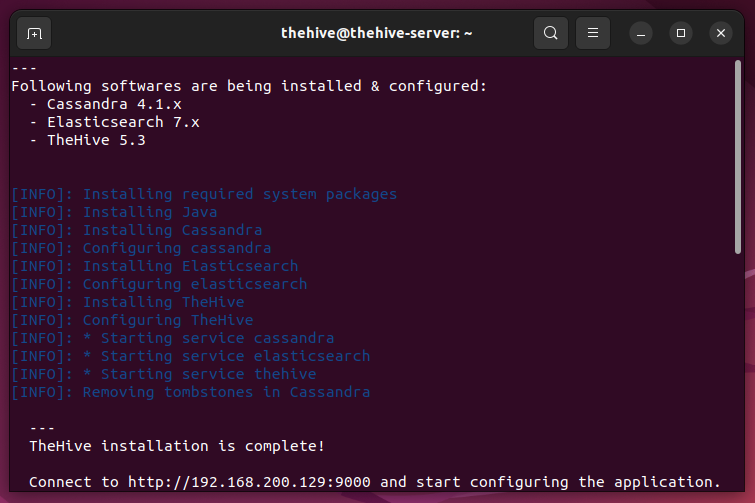
2. We’ll follow the basic TheHive installation guide As the installation process requires many steps, I’ve created a script with all the commands to install the dependencies, Java, Apache Cassandra, Elasticsearch and finally TheHive. The script is stored here: install-thehive.sh. You can download it and execute it:
wget https://raw.githubusercontent.com/ayna-sec/ayna-sec.github.io/refs/heads/master/scripts/install-thehive.sh
sudo chmod +x install-thehive.sh
sudo ./install-thehive.sh
The corrected process is described next:

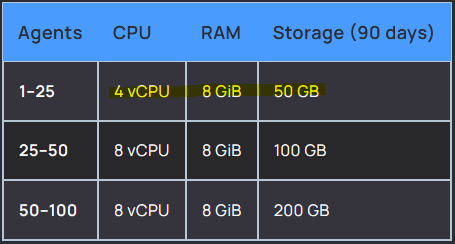
1) Install an Ubuntu 22.04 VM considering the requirementes (4 cores and 16 GB of RAM):
- I deployed a new VM in VMWare with the hardware specifics and 45 GB of disk memory, just in case it needs that space.
- I also chose the graphical version because 16 GB of RAM was already a big stretch for my local machine, so I would use the browser inside the VM.
- During the Ubuntu installation I chose minimal install, so it would take less space.
- I had everything closed on my local machine hoping it wouldn’t break.
2) Set up a static IP.
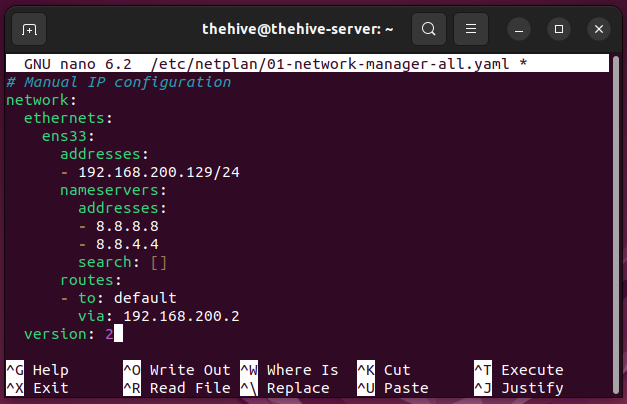
- Try and apply the changes.
sudo netplan try
sudo netplan apply
3) Use the automated installation script made by TheHive.
wget -q -O /tmp/install.sh https://archives.strangebee.com/scripts/install.sh; sudo -v; bash /tmp/install.sh
4) Enter option 2, that is 2) Install TheHive.
5) If the installation and configuration is successful, the output should look like this:
6) Now we can access TheHive in our browser through http://<thehive-ip>:9000 using the default credentials (user admin, password secret).
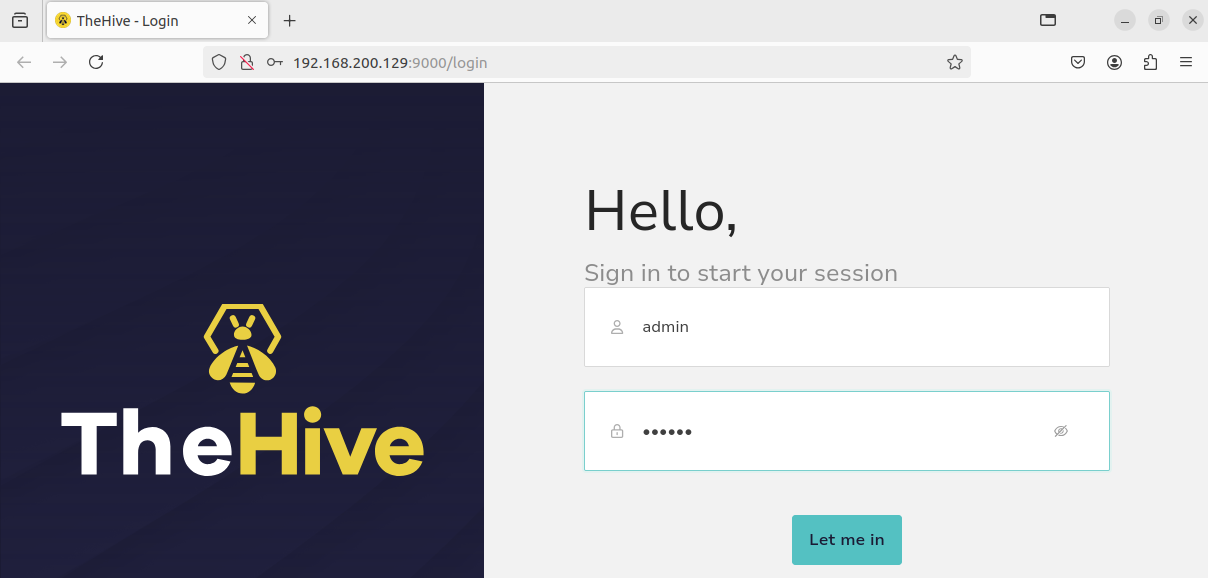
- We can change the password in
http://<ip>:9000/account/password.
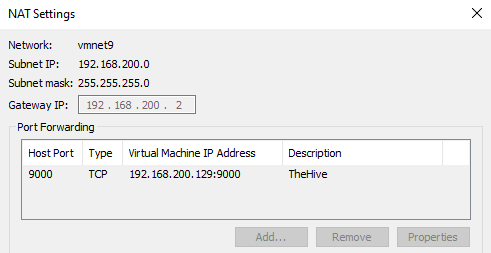
7) For direct access from our local machine, we need to configure port forwarding in VMWare.
- Access
Virtual Network Editor> Click onChange Settings> Select the NAT network (I called itSOC-NET) >NAT Settings> Add port forwarding for the VM IP and TheHive’s port. - Then, we can access from our local machine to
http://<thehive-private-ip>:9000.
3. Wazuh Agents configuration
After we’ve accessed Wazuh WUI (instructions on Section 2.3, step 4-5), we can add the Wazuh agents to our endpoints.
1) Create Endpoint Groups to classify the different types.
- Go to the sidebar menu and navigate to Endpoint Groups.
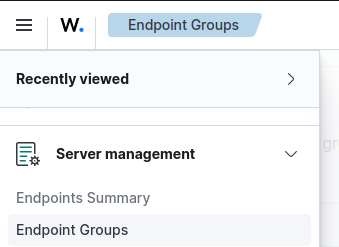
Add new group, for instance:servers,clients,windows,linux.
2) Navigate to Endpoints Summary and deploy new agent.
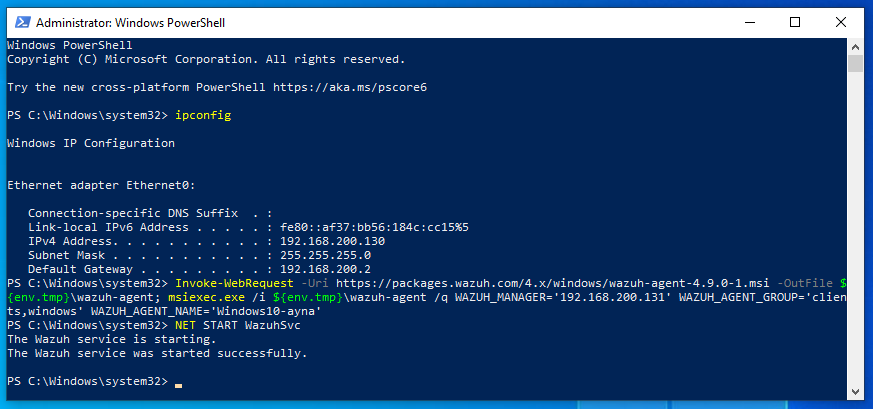
3) Add the Windows 10 client machine.
- Make sure the VM is turned on.
- In the deployment page: select
MSI 32/64 bits, enter the Wazuh server address, add a unique agent name for the Windows machine, select the corresponding groups, copy and paste the assembled command on step 4 into Windows PowerShell ran with administrator privileges.
ℹ️ Clipboard function in VMWare
If you can’t copy and paste from/into a VM, click on
VMin the menu > selectInstall VMWare Tools...> a notification should show up asking to do something with theD:drive, click on it > start theset up> install VMWare Tools.
- Start the Wazuh service.
NET START WazuhSvc
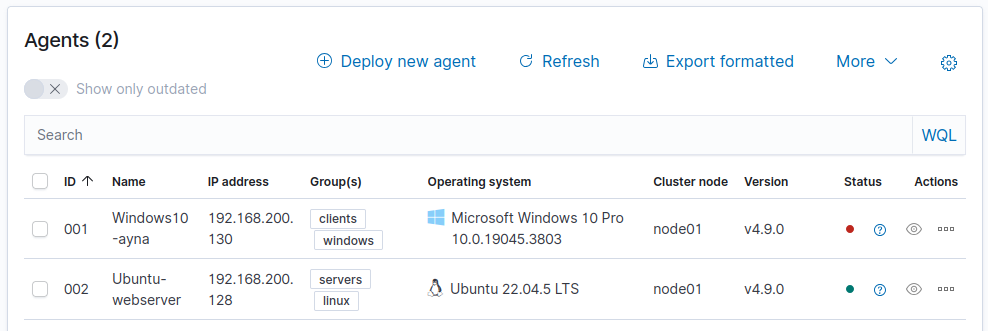
4) Repeat the process with the Ubuntu Web Server, but in this case, select DEB amd64.

The agents table now includes both machines:
🧭 The next stages of the project will be:
- Testing use case with
mimikatz.- Setting up SOAR and integrating components.
🔔 To stay updated on new additions to the project, follow me/add me on Linkedin.